Richer Convolutional Features (RCF) for Edge Detection - 윤곽선 검출
이 글에서는 RCF(Richer Convolutional Features for Edge Detection)를 이용하여 윤곽선을 검출하는 방법에 대해 소개하겠습니다. 이 알고리즘은 XuanyiLi에 의해 소개 되었습니다.
소개된 자료를 보면 성능적인 측면에서 앞서 소개한 HED (Holistically-Nested Edge Detection) 보다 좋은 것 같습니다.
| Method | BSDS500 dataset | NYUD |
| RCF | 0.819 | 0.781 |
| HED | 0.788 | 0.741 |
디렉토리 구조는 다음과 같이 구성했습니다. 소스코드는 Github에 있습니다.
├── detectors
│ ├── rcf
│ │ ├── weights
│ │ │ └── only-final-lr-0.01-iter-130000.pth
│ │ ├── __init__.py
│ │ └── models.py
│ └── __init__.py
├── lib
│ └── utils.py
├── asset
│ ├── images
│ │ ├── test_01.jpg
│ │ ├── test_02.jpg
│ │ ├── test_03.jpg
│ └ └── test_04.jpg
└── RCF_detector.ipynb
먼저 사전 훈련된 모델 파일 다운로드가 필요합니다.
1. Import Packages
import time
import torch
from .models import resnet101
import cv2
import numpy as np
import datetime
2. Class definition
제가 Class로 정의하는 이유는 첫째는 사용하기 편하게 하기 위해서고, 둘째는 Output의 모습을 맞추어 비교하기 위해서 입니다. Class로 정의하지 않고 간단하게 사용 할 수도 있습니다.
PATH_WEIGHT = './detectors/rcf/weights/only-final-lr-0.01-iter-130000.pth'class RCF():
def __init__(self, device='cuda'):
tstamp = time.time()
self.device = device
device = torch.device(device)
self.net = resnet101(pretrained=False)
print('[RCF] loading with', self.device)
self.net.load_state_dict(torch.load(PATH_WEIGHT, map_location=device))
self.net.eval()
print('[RCF] finished loading (%.4f sec)' % (time.time() - tstamp))
def detect_edge(self, img):
start_time = datetime.datetime.now()
print('시작시간 : {}'.format(start_time))
org_img = np.array(img, dtype=np.float32)
h, w, _ = org_img.shape
pre_img = self.prepare_image_cv2(org_img)
pre_img = torch.from_numpy(pre_img).unsqueeze(0)
outs = self.net(pre_img, (h, w))
result = outs[-1].squeeze().detach().cpu().numpy()
result = (result * 255).astype(np.uint8)
end_time = datetime.datetime.now()
print('종료시간 : {}'.format(end_time))
time_delta = end_time - start_time
print('수행시간 : {} 초'.format(time_delta.seconds) + "\n")
return result
def prepare_image_cv2(self, im):
im = cv2.resize(im, dsize=(1024, 1024), interpolation=cv2.INTER_LINEAR)
im = np.transpose(im, (2, 0, 1)) # (H x W x C) to (C x H x W)
return im3. Test
Colab 또는 Jupyter Notebook에서 이미지를 확인하기 위한 Function과 contours 찾고 그리는 Function은 utils.py 파일로 정의했습니다.
from detectors import RCF
import cv2
from imutils.perspective import four_point_transform
from lib.utils import plt_imshow, find_contours, draw_contours
detection_model = RCF(device='cpu')테스트를 진행 할 이미지를 Load합니다.
IMAGE_PATH = 'asset/images/test_04.jpg'
img = cv2.imread(IMAGE_PATH)
plt_imshow(["Original"], [img])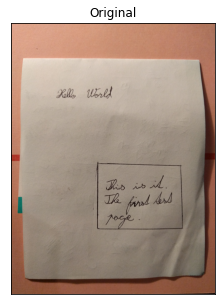
edge_img = detection_model.detect_edge(img)
plt_imshow(["img", "edge"], [img, edge_img])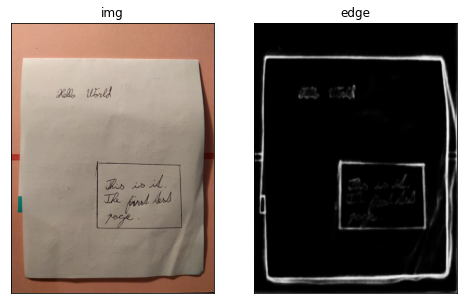
receiptCnt = find_contours(edge_img, 127)
draw_contours(img, receiptCnt)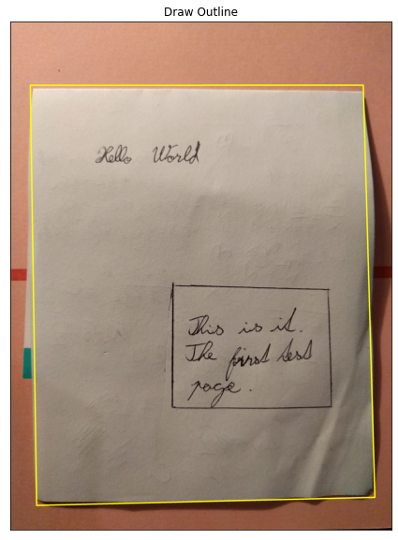
receipt = four_point_transform(img, receiptCnt.reshape(4, 2))
plt_imshow("Receipt Transform", receipt)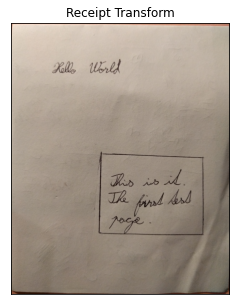
더보기
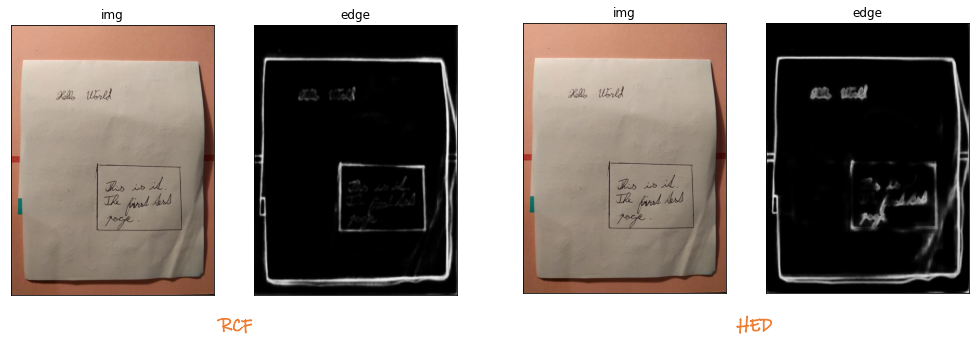
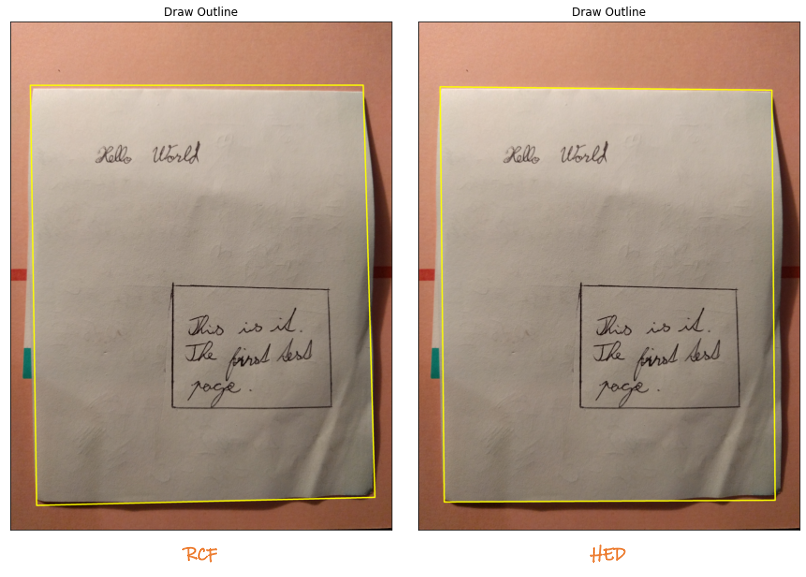
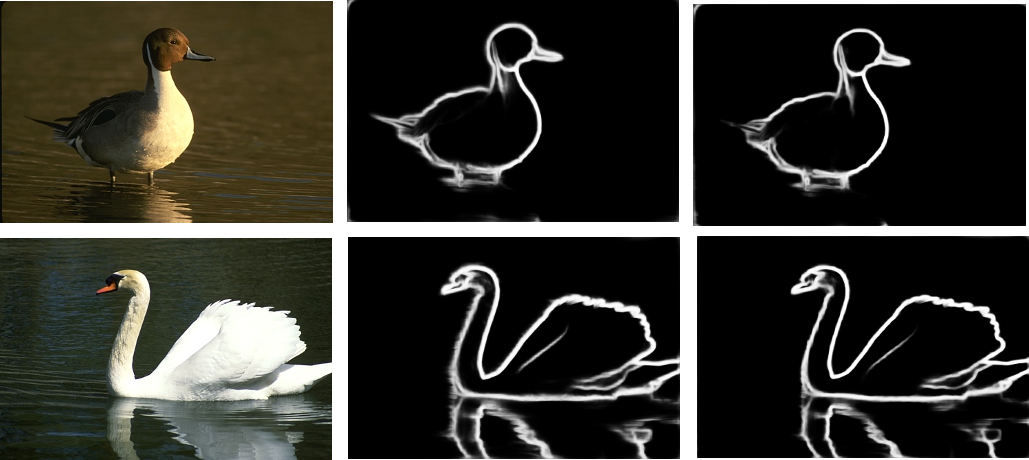
RCF VS HED
결과적으로 큰 차이는 없어 보이지만 RCF가 좀 더 깔끔하게 윤곽의 이미지로 변환한 것 같습니다.
윤곽선 검출의 경우는 이미지 연산하는 로직이 포함되어 있으니 성능을 비교 할 수 없습니다. 다만 GPU를 사용하지 않을 경우 속도 측면에서는 HED가 빠르네요. HED 소개 문서에서도 1장당 0.4초라 하니 빠르기는 합니다.