나만의 ChatGPT Plugin 만들기: TODO List (No Auth)
OpenAI의 ChatGPT는 확장 가능한 구조를 가지고 있습니다. 특히 OpenAI는 Plugin이라는 기능을 제공하는데 이는 사용자가 매우 빠르고 간단하게 나만의 기능을 구축할 수 있게 해줍니다. OpenAI에서 소개하는 기본 예제 중 Todo 리스트를 이용하여 나만의 Plugin을 만들어보도록 하겠습니다. 기본 예제는 리스트에 데이터를 저장하는 방식을 사용하지만, 이 글에서는 데이터를 Sqlite DB에 저장하는 방식으로 조금 더 발전시켜 보겠습니다.
ChatGPT의 Todo Plugin을 직접 만들어보며, 로컬 환경에서 어떻게 설정하고 사용하는지에 대한 과정을 단계별로 알아보겠습니다.
#1. 환경구성
1) python은 3.10 버전 설치 (가상환경)
conda create -n test_env python=3.102) 가상환경 활성화
conda activate test_env3) ChatGPT_Todo_Plugin Fork
- GitHub에서 https://github.com/yunwoong7/ChatGPT_Todo_Plugin 주소로 이동합니다.
- 오른쪽 상단에 있는 'Fork' 버튼을 클릭하여 자신의 계정에 Fork를 생성합니다.

4) Fork한 ChatGPT_Todo_Plugin Download
여기서 [YOUR_USERNAME]은 GitHub 사용자 이름으로 대체해주세요.
git clone https://github.com/[YOUR_USERNAME]/ChatGPT_Todo_Plugin.git
cd /ChatGPT_Todo_Plugin
5) install package
필요한 패키지를 설치합니다.
pip install quart
pip install quart-cors
#2. Source code
- sqlite3: SQLite 데이터베이스를 사용하기 위한 라이브러리
- quart: 비동기 웹 프레임워크
- quart_cors: Quart 애플리케이션에 CORS(Cross-Origin Resource Sharing) 지원을 추가하기 위한 라이브러리
1) ai-plugin.json
ai-plugin.json 파일입니다. 파일의 경로는 .well-known 폴더 하위에 있습니다.
{
    "schema_version": "v1",
    "name_for_human": "TODO List (no auth)",
    "name_for_model": "todo",
    "description_for_human": "Manage your TODO list. You can add, remove and view your TODOs.",
    "description_for_model": "Plugin for managing a TODO list, you can add, remove and view your TODOs.",
    "auth": {
      "type": "none"
    },
    "api": {
      "type": "openapi",
      "url": "http://localhost:5001/openapi.yaml"
    },
    "logo_url": "http://localhost:5001/logo.png",
    "contact_email": "legal@example.com",
    "legal_info_url": "http://example.com/legal"
  }
2) openapi.yaml
Open API 문서입니다. 이 문서는 API의 엔드포인트, 요청 및 응답 형식, 사용 가능한 스키마 등에 대한 정보를 제공합니다.
openapi: 3.0.1
info:
  title: TODO Plugin
  description: A plugin that allows the user to create and manage a TODO list using ChatGPT. If you do not know the user's username, ask them first before making queries to the plugin. Otherwise, use the username "global".
  version: 'v1'
servers:
  - url: http://localhost:5001
paths:
  /todos/{username}:
    get:
      operationId: getTodos
      summary: Get the list of todos
      parameters:
      - in: path
        name: username
        schema:
            type: string
        required: true
        description: The name of the user.
      responses:
        "200":
          description: OK
          content:
            application/json:
              schema:
                $ref: '#/components/schemas/getTodosResponse'
    post:
      operationId: addTodo
      summary: Add a todo to the list
      parameters:
      - in: path
        name: username
        schema:
            type: string
        required: true
        description: The name of the user.
      requestBody:
        required: true
        content:
          application/json:
            schema:
              $ref: '#/components/schemas/addTodoRequest'
      responses:
        "200":
          description: OK
    delete:
      operationId: deleteTodo
      summary: Delete a todo from the list
      parameters:
      - in: path
        name: username
        schema:
            type: string
        required: true
        description: The name of the user.
      requestBody:
        required: true
        content:
          application/json:
            schema:
              $ref: '#/components/schemas/deleteTodoRequest'
      responses:
        "200":
          description: OK

components:
  schemas:
    getTodosResponse:
      type: object
      properties:
        todos:
          type: array
          items:
            type: string
          description: The list of todos.
    addTodoRequest:
      type: object
      required:
      - todo
      properties:
        todo:
          type: string
          description: The todo to add to the list.
          required: true
    deleteTodoRequest:
      type: object
      required:
      - todo_idx
      properties:
        todo_idx:
          type: integer
          description: The index of the todo to delete.
          required: true
3) main.py
- init_db(): 데이터베이스를 초기화하는 함수로, todos라는 테이블을 생성합니다. 이 테이블에는 사용자 이름(username)과 해당 사용자의 할 일 목록(todos)이 저장
- add_todo(): 사용자의 할 일을 추가하는 엔드포인트
- get_todos(): 사용자의 할 일 목록을 가져오는 엔드포인트
- delete_todo(): 사용자의 특정 할 일을 삭제하는 엔드포인트
- plugin_logo(): 플러그인의 로고 이미지를 제공하는 엔드포인트
- plugin_manifest(): 플러그인의 메타데이터를 제공하는 엔드포인트
- openapi_spec(): OpenAPI 명세서를 제공하는 엔드포인트
- quart_cors.cors(): 애플리케이션에 CORS를 적용하여 "https://chat.openai.com" 도메인에서의 요청을 허용
import sqlite3
import quart
import quart_cors
from quart import request

app = quart_cors.cors(quart.Quart(__name__), allow_origin="https://chat.openai.com")

DATABASE = "todos.db"


def init_db():
    with sqlite3.connect(DATABASE) as con:
        cur = con.cursor()
        cur.execute('''CREATE TABLE IF NOT EXISTS todos
                       (username TEXT PRIMARY KEY, todos TEXT)''')
        con.commit()


@app.post("/todos/<string:username>")
async def add_todo(username):
    request_data = await quart.request.get_json(force=True)
    todo = request_data["todo"]

    with sqlite3.connect(DATABASE) as con:
        cur = con.cursor()
        cur.execute("SELECT todos FROM todos WHERE username=?", (username,))
        existing_todos = cur.fetchone()

        if existing_todos:
            todos_list = existing_todos[0].split('|')
            todos_list.append(todo)
            cur.execute("UPDATE todos SET todos=? WHERE username=?", ('|'.join(todos_list), username))
        else:
            cur.execute("INSERT INTO todos (username, todos) VALUES (?, ?)", (username, todo))

        con.commit()

    return quart.Response(response='OK', status=200)


@app.get("/todos/<string:username>")
async def get_todos(username):
    with sqlite3.connect(DATABASE) as con:
        cur = con.cursor()
        cur.execute("SELECT todos FROM todos WHERE username=?", (username,))
        todos = cur.fetchone()

    if todos:
        return quart.Response(response='|'.join(todos), status=200)
    else:
        return quart.Response(response='', status=200)


@app.delete("/todos/<string:username>")
async def delete_todo(username):
    request_data = await quart.request.get_json(force=True)
    todo_idx = request_data["todo_idx"]

    with sqlite3.connect(DATABASE) as con:
        cur = con.cursor()
        cur.execute("SELECT todos FROM todos WHERE username=?", (username,))
        todos = cur.fetchone()

        if todos:
            todos_list = todos[0].split('|')
            if 0 <= todo_idx < len(todos_list):
                todos_list.pop(todo_idx)
                cur.execute("UPDATE todos SET todos=? WHERE username=?", ('|'.join(todos_list), username))
                con.commit()

    return quart.Response(response='OK', status=200)


@app.get("/logo.png")
async def plugin_logo():
    filename = 'logo.png'
    return await quart.send_file(filename, mimetype='image/png')


@app.get("/.well-known/ai-plugin.json")
async def plugin_manifest():
    host = request.headers['Host']
    with open("./.well-known/ai-plugin.json") as f:
        text = f.read()
        return quart.Response(text, mimetype="text/json")


@app.get("/openapi.yaml")
async def openapi_spec():
    host = request.headers['Host']
    with open("openapi.yaml") as f:
        text = f.read()
        return quart.Response(text, mimetype="text/yaml")


def main():
    init_db()  # 데이터베이스 초기화
    app.run(debug=True, host="localhost", port=5001)


if __name__ == "__main__":
    main()
#3. 수행
python main.py아래는 Quart 애플리케이션을 실행했을 때의 예시 출력입니다.

#4. Plugins 활성화
Plugins이 비활성 상태라면 활성화가 필요합니다. Plugins 를 활성화하는 방법은 간단합니다. Settings 메뉴에서 Beta features 섹션을 선택하고, Plugins를 클릭하면 됩니다. 활성화하고 나면, GPT-4 하위 항목에서 'Plugins'를 선택할 수 있게 됩니다.
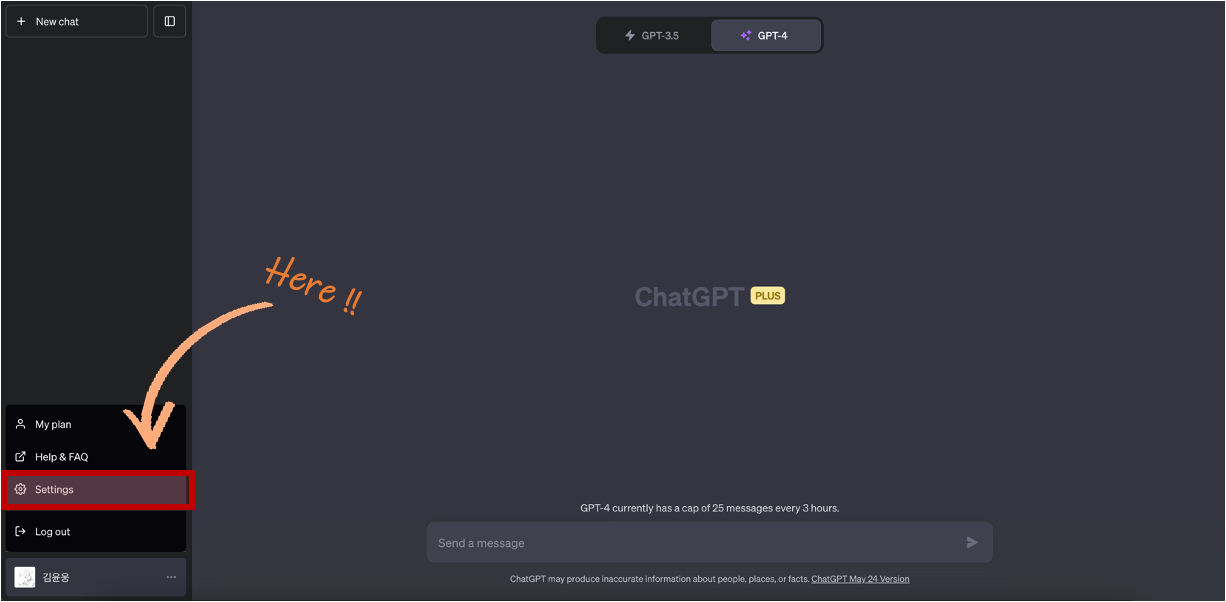
[ Settings ]를 클릭하면 Settings 화면이 열립니다.
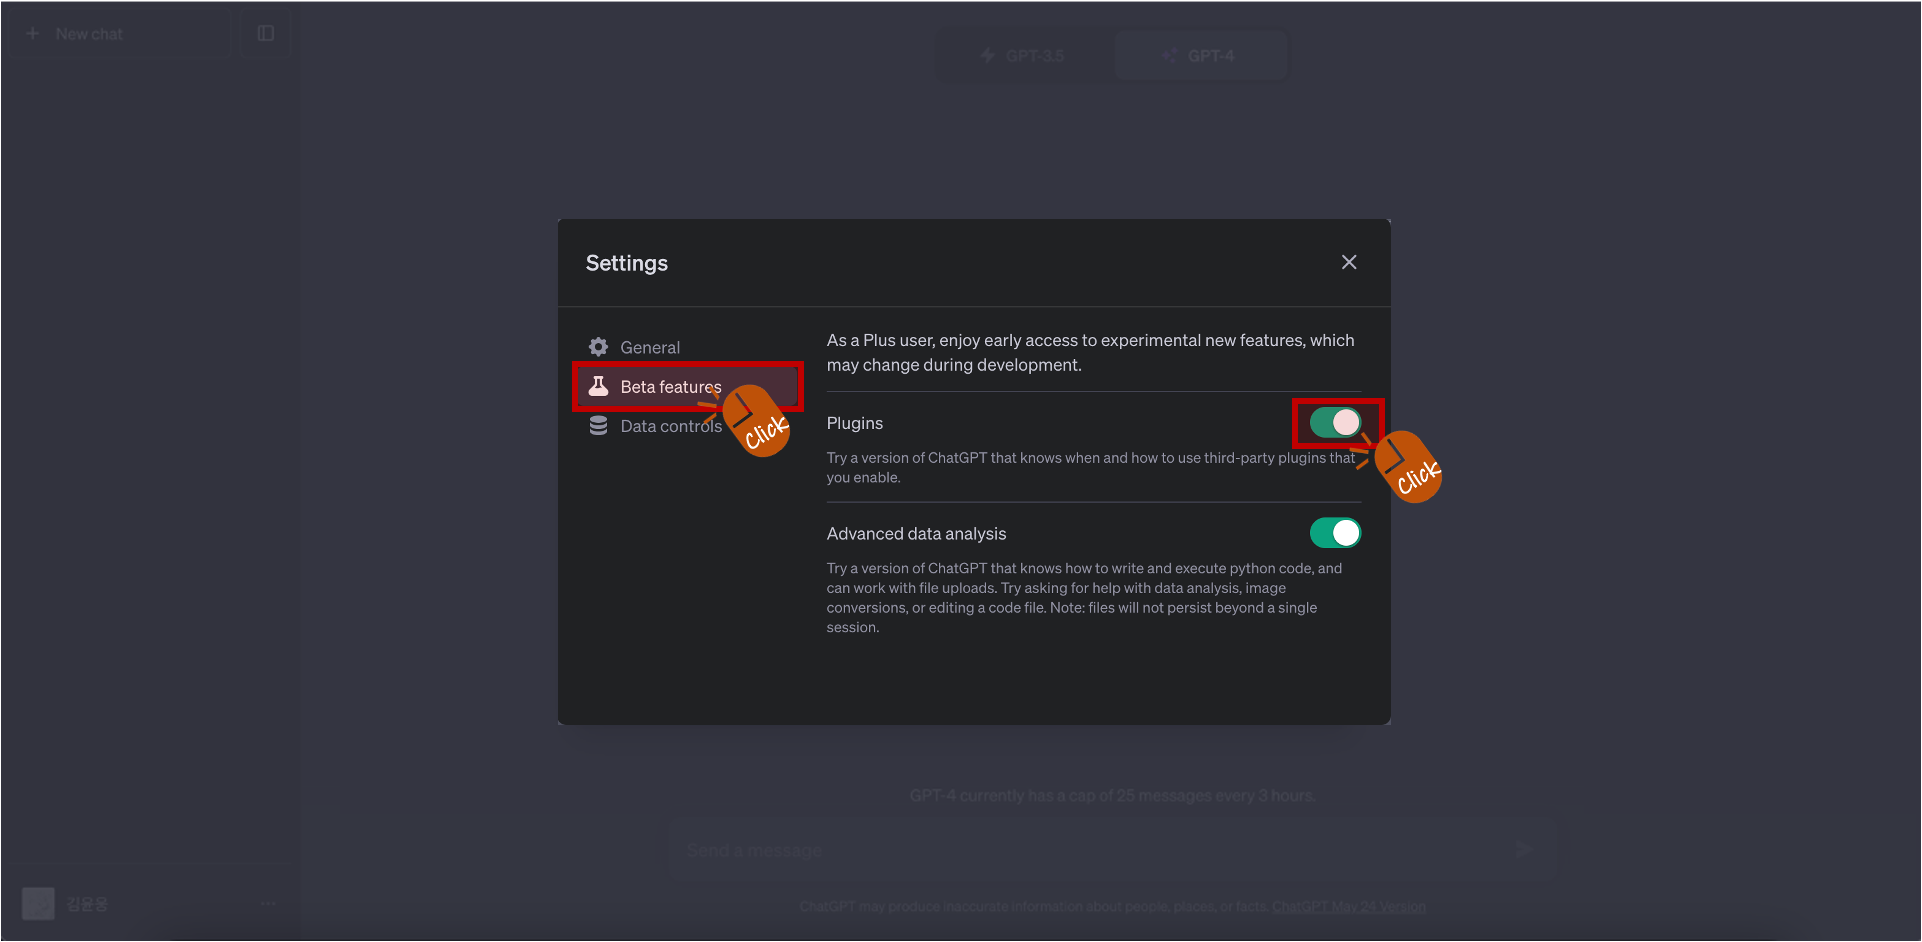
[ Beta features ]를 클릭하고 Plugins을 클릭하여 활성화합니다.
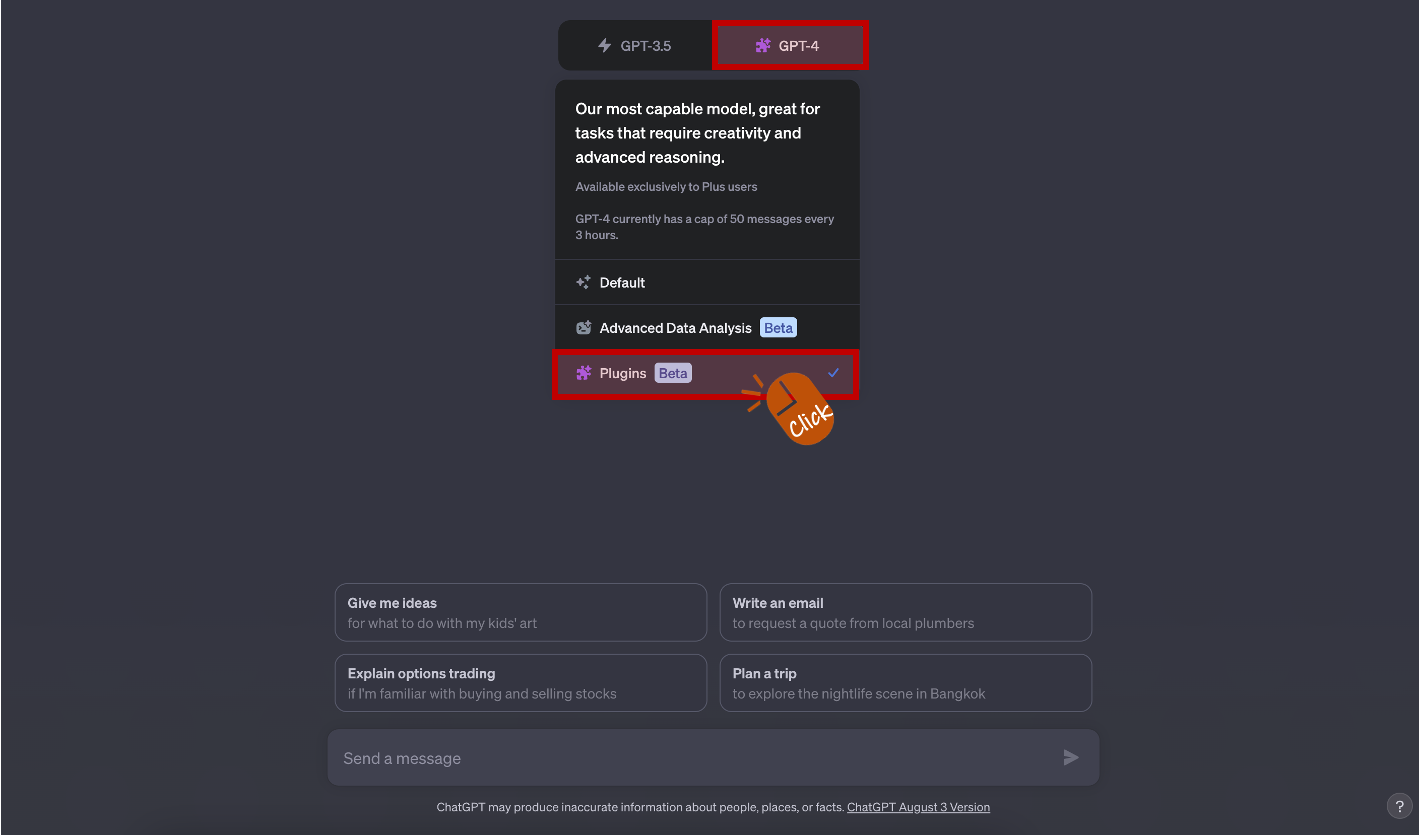
Plugins을 사용할 수 있는 경우 GPT-4 하위 항목에서 'Plugins (Beta)'를 선택할 수 있습니다.
#5. ChatGPT Todo Plugin 설치하기 (Localhost)
설치 전 python main.py 를 실행하여 수행중이여야 합니다. 이제 Local Todo Plugin을 설치하도록 하겠습니다.

Plugins (Beta)를 클릭하면 "No plugins enabled" 메시지가 표시됩니다. 만약 이전에 설치한 Plugin이 있다면 해당 Plugin 목록이 보일 것입니다. 저는 모든 Plugin을 삭제한 상태이므로 해당 메시지만 보입니다. Plugin을 추가하기 위해서 "Plugin store" 버튼을 클릭합니다.
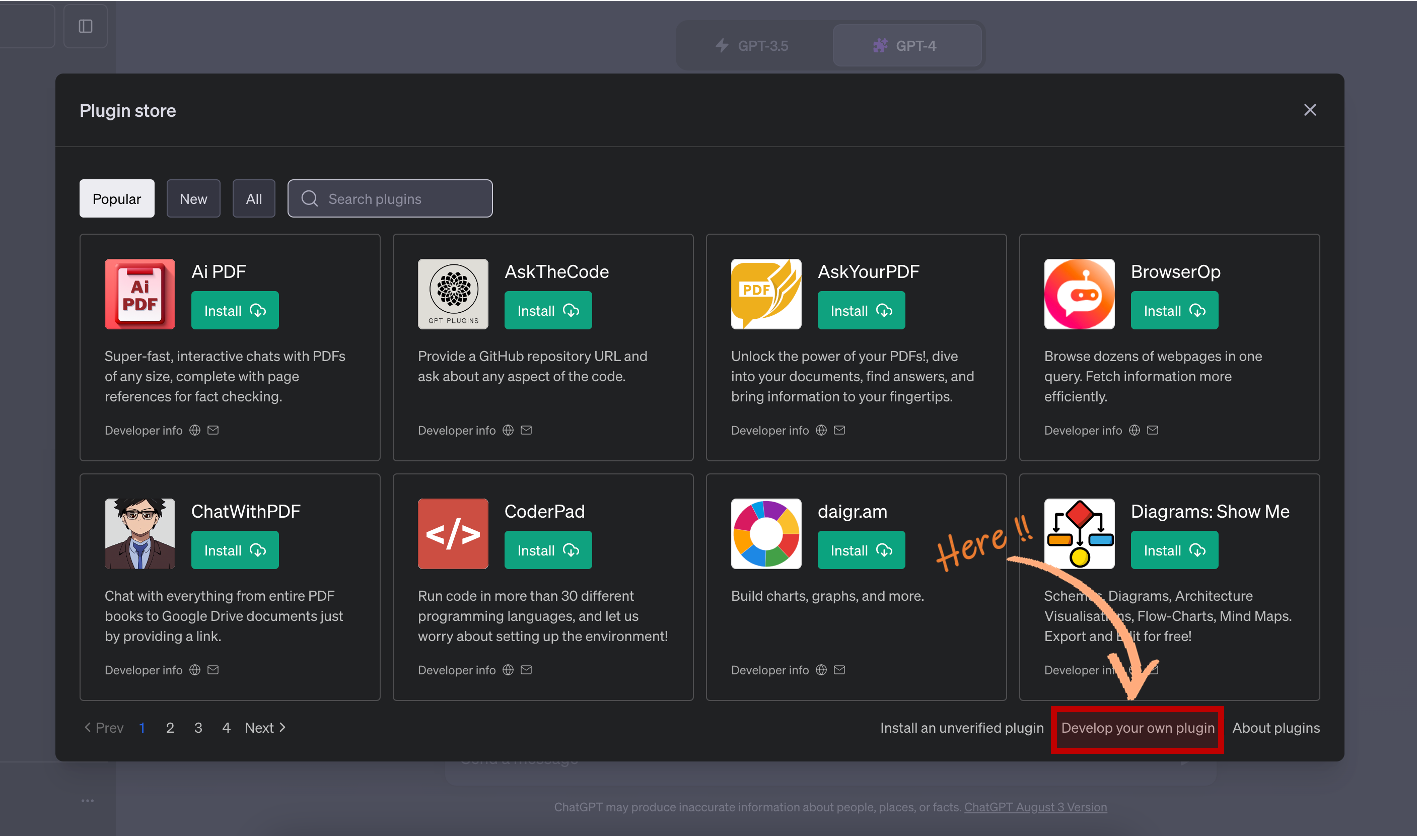
Plugin store에서 우측 하단에 "Develop you own plugin" 버튼을 클릭합니다.
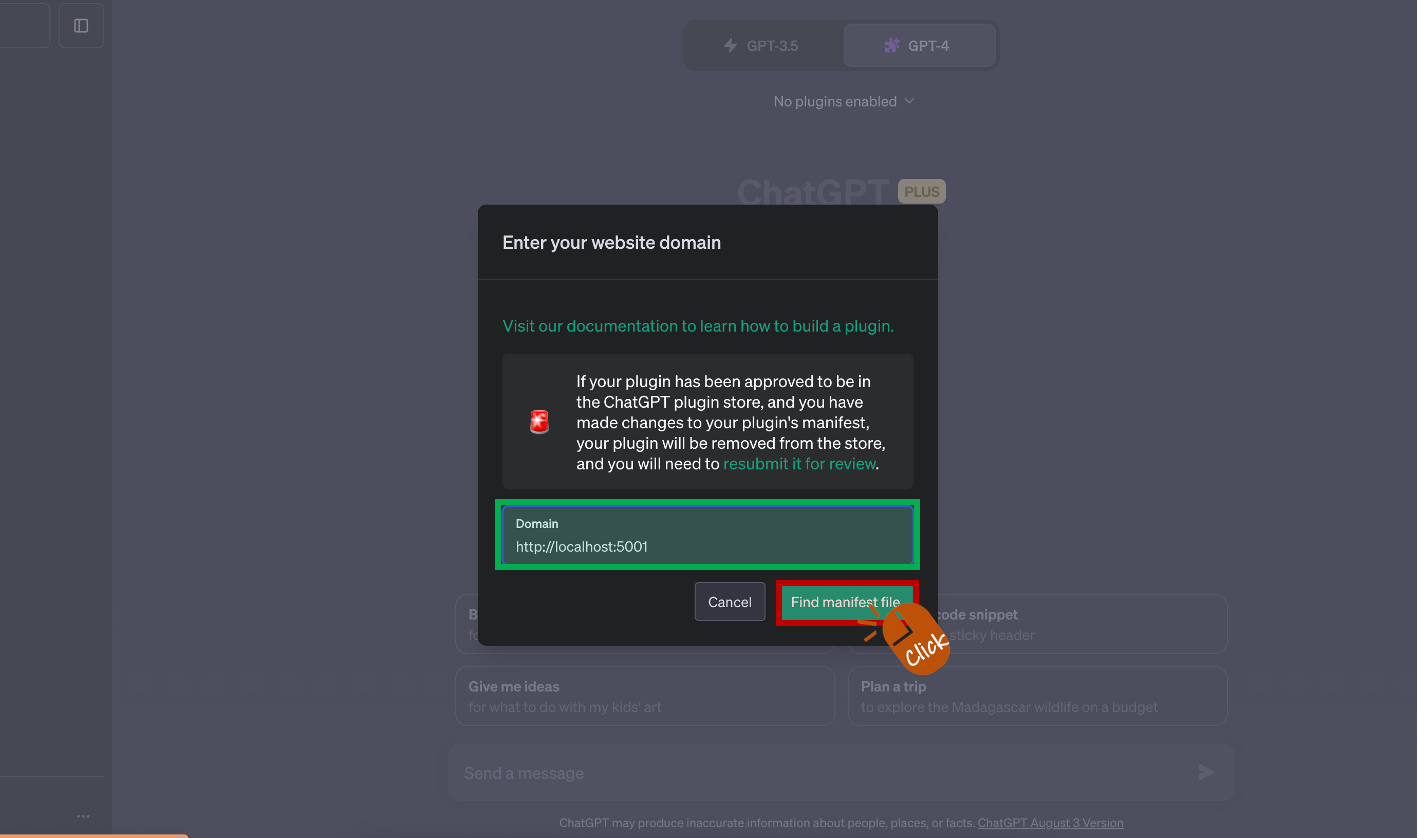
Domain 입력란에 http://localhost:5001 를 입력합니다.

manifest와 OpenAPI Spec 을 체크합니다. manifest는 Plugin이나 애플리케이션에 대한 메타데이터를 제공하는 파일입니다. OpenAPI Spec은 RESTful API를 설명하기 위한 표준화된 스펙입니다. 만약 ✅ 정상 체크가 되지 않았다면 ai-plugin.json, openapi.yaml 파일을 살펴봐야 합니다.
[ Install localhost plugin ] 버튼을 클릭합니다. logo.png를 수정했다면 변경된 아이콘이 표시될 것입니다.

설치가 되었다면 설치한 plugin 목록에서 확인하실 수 있습니다.
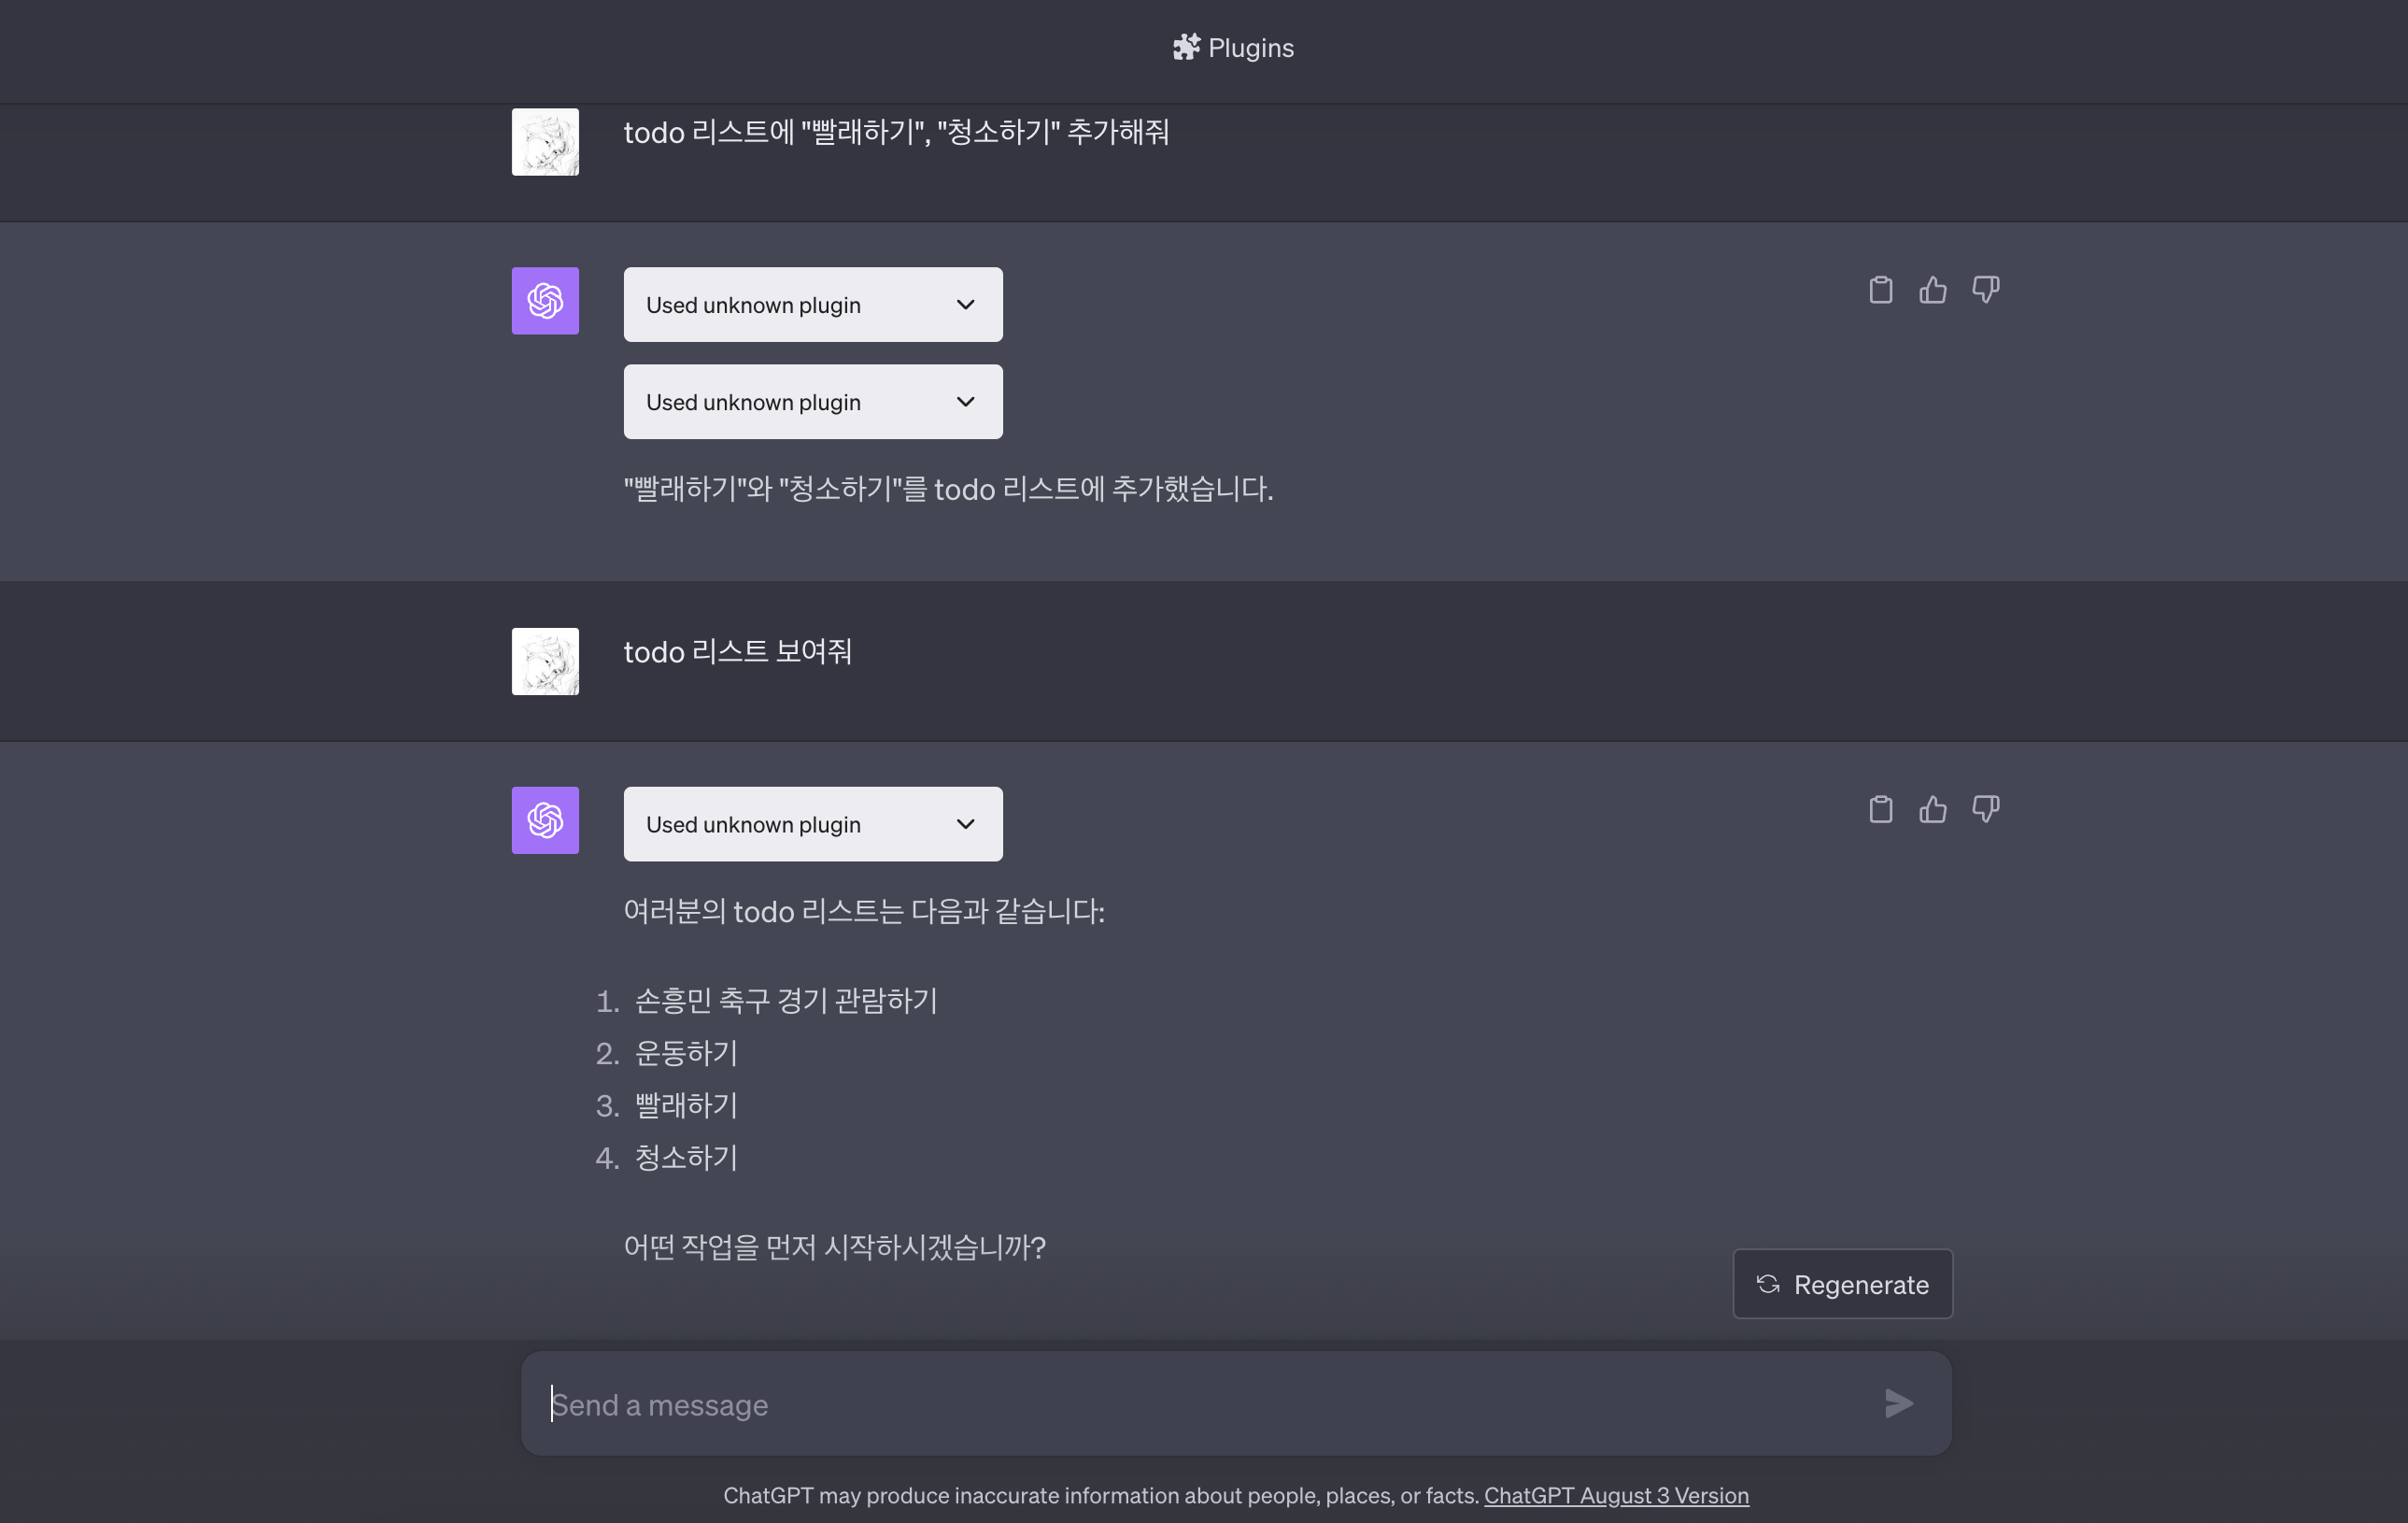
#6. 나만의 Plugin (Todo List) 사용하기
나만의 ChatGPT Todo Plugin을 만들고, 로컬 환경에서 설정하여 사용하는 방법에 대해 알아보았습니다. 이러한 Plugin을 활용하면 ChatGPT를 더욱 다양하게 활용할 수 있게 되며, 개인화된 작업 관리 및 다양한 기능을 추가로 제공받을 수 있습니다.
기술의 발전과 함께 다양한 플러그인과 확장 기능들이 계속해서 나올 것이기때문에 지속적인 학습과 개발을 통해 최신 트렌드를 따라가는 것이 중요한 것 같습니다. Plugin인 개발에 관심이 있으신 분들에게 이 글이 도움이 되길 바랍니다.
'Tech & Development > AI' 카테고리의 다른 글
| GPT-4 with Vision API를 사용하여 이미지 인식 (Python) (3) | 2023.11.11 |
|---|---|
| 나만의 ChatGPT Plugin 만들기: NAVER 검색엔진 (0) | 2023.10.19 |
| ChatGPT Retrieval Plugin 개발 (4) : ChatGPT에 개발한 Plugin 추가하기 (0) | 2023.09.23 |
| ChatGPT Retrieval Plugin 개발 (3) : 클라우드 배포 (0) | 2023.09.17 |
| ChatGPT Retrieval Plugin 개발 (2) : 배포 및 실용 가이드 (0) | 2023.08.28 |